Configuring the NetSuite Plugin
You can configure the NetSuite plugin to meet your (merchant’s) needs. This includes adding payment methods and configuring payments.
AltaPay credentials
- Username
- Password
AltaPay gateway information
- Terminal
- Gateway
Adding a payment method
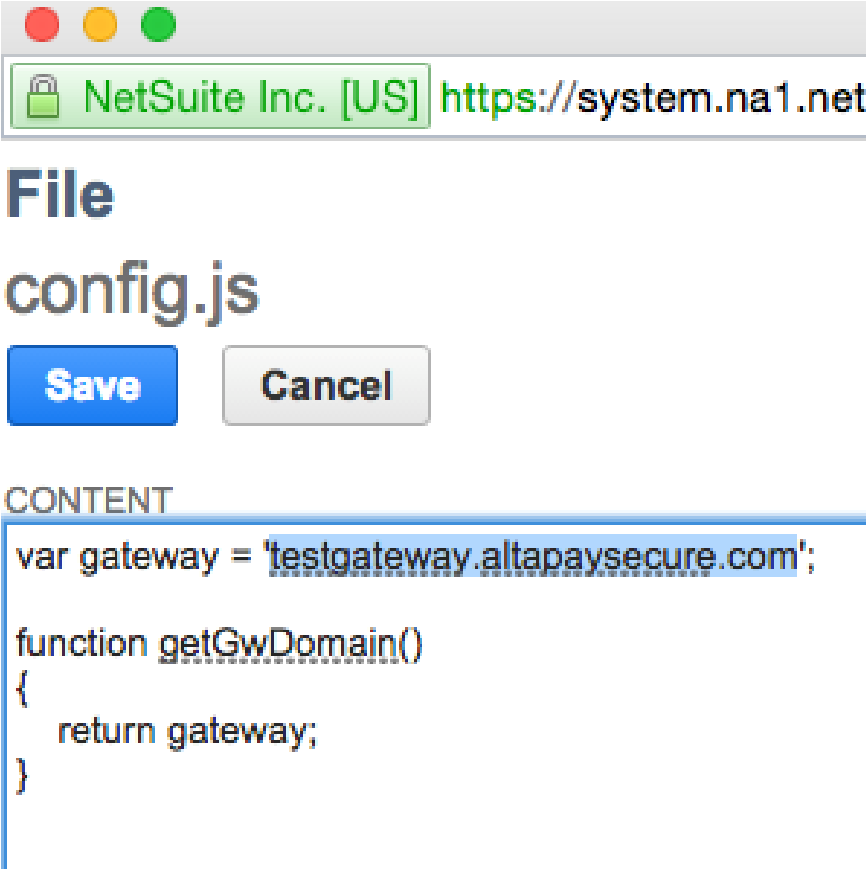
The standard configuration connects the bundle with the test gateway. Follow the below steps to connect the bundle with AltaPay’s production gateway.
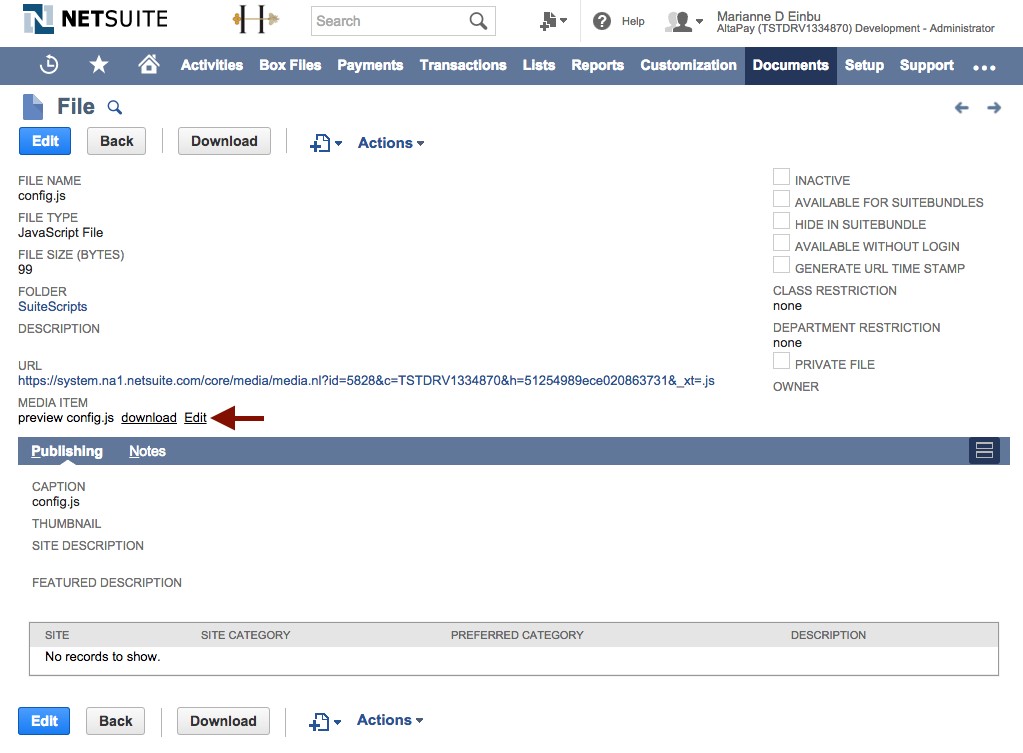
- Go to Customization > Plug-ins > Plug-in implementations.
- Click on ‘config.js’ in the AltaPay bundle.
- Click ‘Edit’ and replace 'testgateway.altapaysecure.com' with the gateway information for your production environment (provided by AltaPay). Do not include ’https’.
- Press .

Credit/debit cards
In this step you add card as payment method in the web shop. You must complete the steps for each currency.
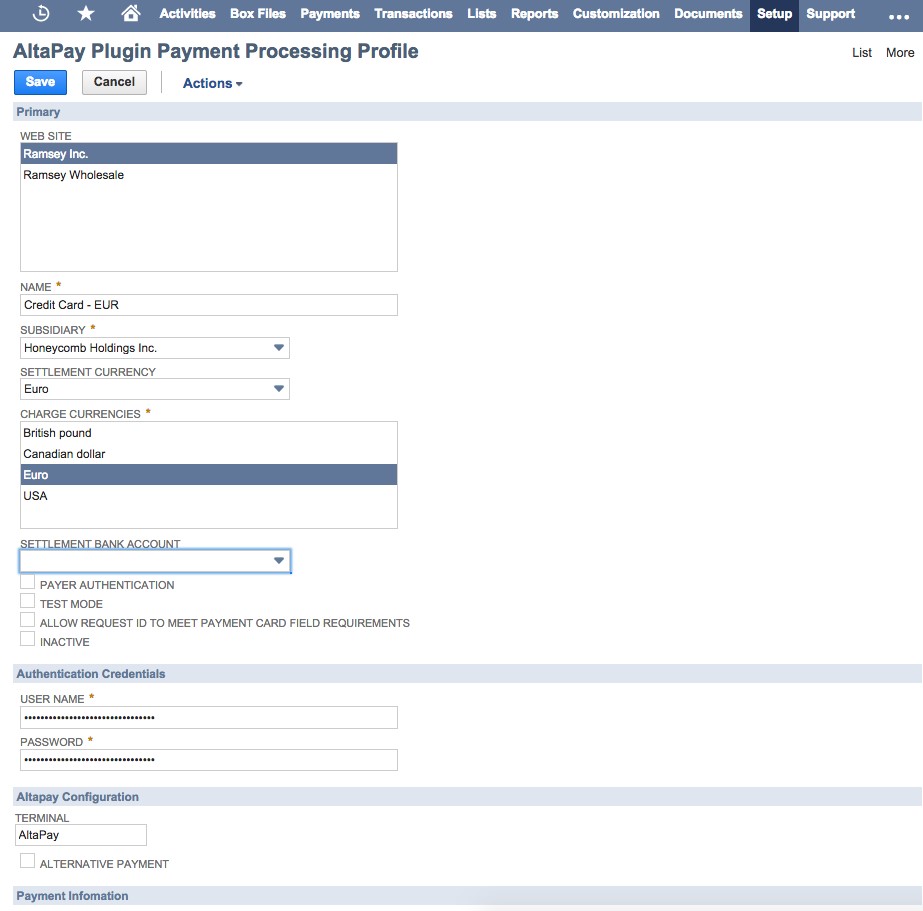
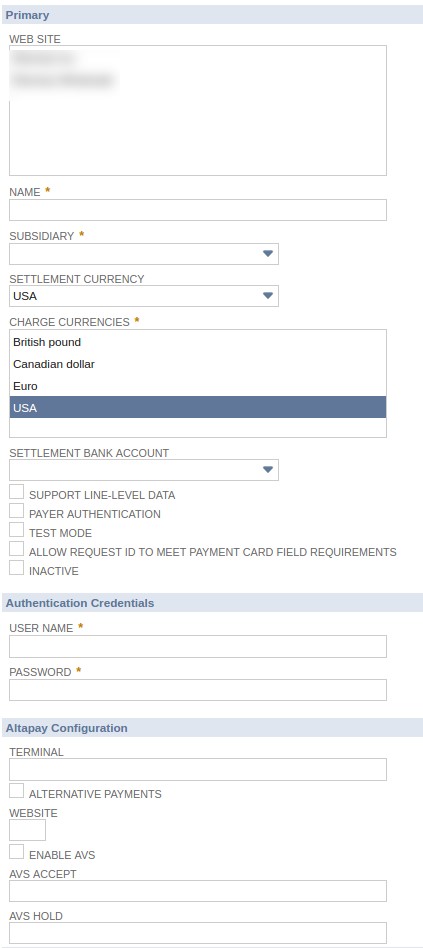
- Go to setup > Accounting > Payment Processing Profiles > ‘Add AltaPay Plugin Profile’.

- Complete the details, using the notes below for guidance.
WEB SITE
Select which web sites the bundle should cover
NAME
This is for internal use and will not be shown to customers. We recommend that you use ‘Payment Method - Currency’ (e.g. Credit Card - EUR)
Subsidiary
Select from the drop-down list
CHARGE CURRENCIES
This must correspond with the currency of the terminal. You can only select one currency
Settlement Bank account
This is related to accounting and will not affect the settlement agreement with the acquirer
Authentication Credentials
Enter the username and password. You will only be able to see asterisks, since they are password fields
AltaPay configuration
Add terminal
Alternative payment
Leave the checkbox unchecked
Gateway Request Types
Add the types that are needed for the terminal
- Press .
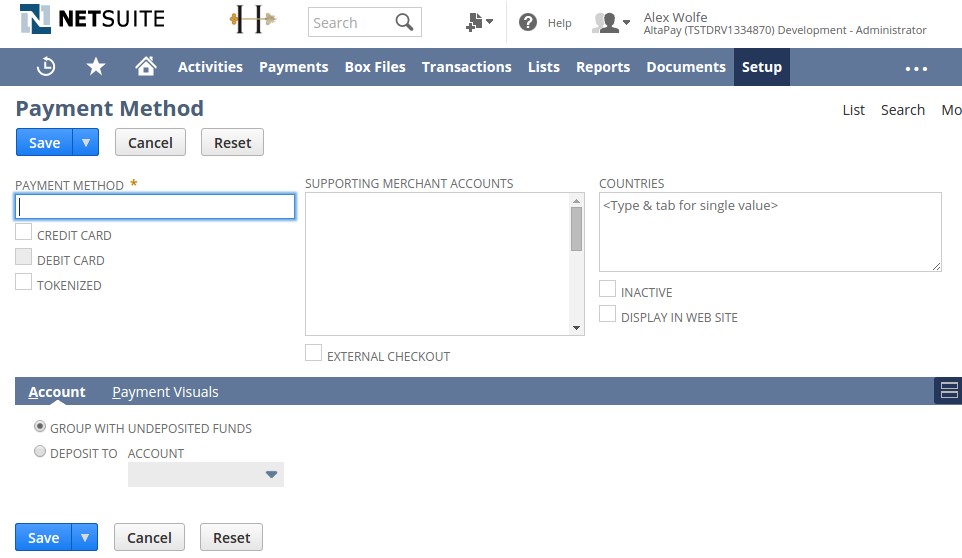
- Go to Setup > Accounting > Accounting lists > New > Select ‘Payment Method’.

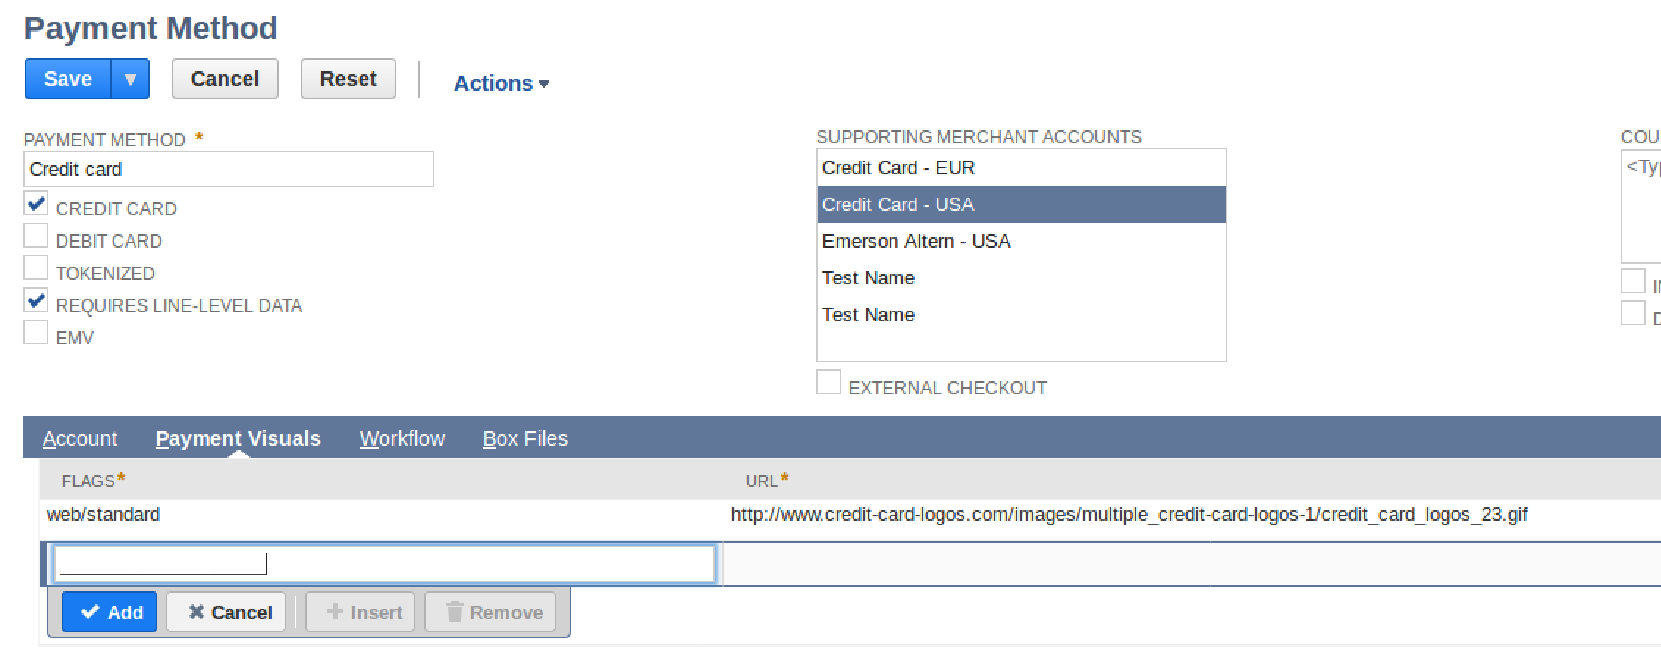
- Complete the details, using the screenshot and notes below for guidance.
PAYMENT METHOD
Name the payment method. This will be shown in the web shop.
CREDIT CARD
Select this checkbox
SUPPORTING MERCHANT ACCOUNTS
Select the Payment processing profile you want to match to the payment method. (NAME in the Payment Processing Profile screen)
Flag web/standard URL Place the icon in the File Cabinet and link to the icon or link to an icon on the internet - Press .
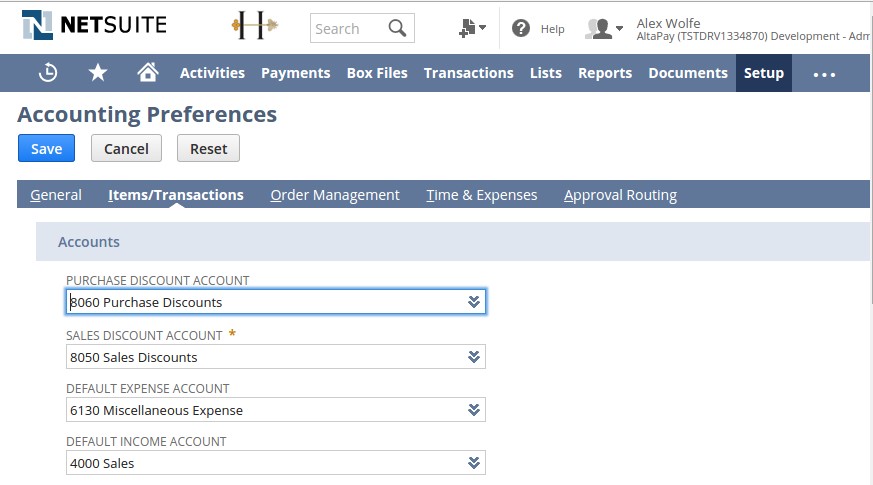
Next, you need to configure the payments. This is mandatory if CVC needs to be enabled for card payments. This is highly recommended and may be required by the acquirer.
- Go to Setup > Accounting > Accounting preferences > Click the tab ‘Items/Transactions’ .

- Check ‘USE CARD SECURITY CODE FOR CREDIT CARD TRANSACTIONS’ under the ‘Payment Processing’ section
- Press .
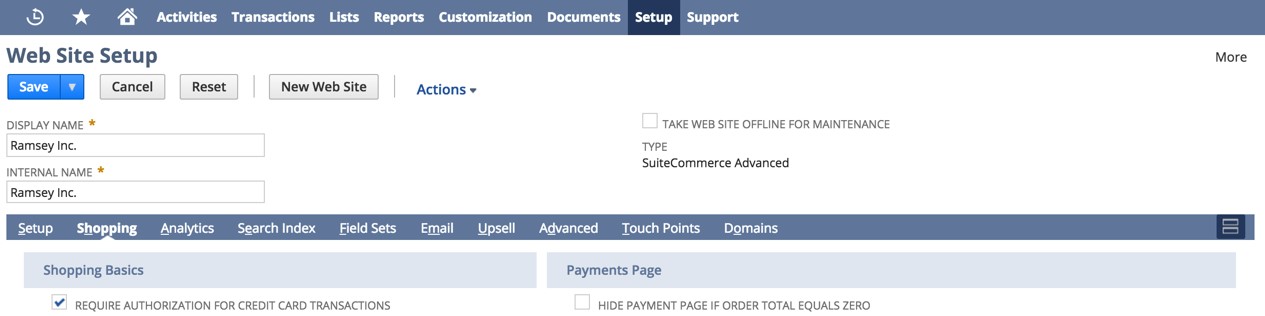
Now, enable the payments on the website.
- Go to: Setup > Site Builder or Suite Commerce Advanced > Set Up Website
- Click edit on the website for which you want to enable payments.
- Click the ‘Shopping’ tab and check ‘REQUIRE AUTHORIZATION FOR CREDIT CARD TRANSACTIONS’.

- Press ‘Save’ .
If the merchant has Suite Commerce Advanced version previous to Denali, you must enable support by completing these additional steps.
- Download the zip file from the GitHub repository
- Find the ‘Utils.js’ in the ‘SCA’ subfolder.
- Replace ‘AltaPay CC’,line no: 176, with the name of the payment method created earlier. The name is case sensitive.
- Go to: Documents > Files > File Cabinet
- Go to: Web Site Hosting Files > Live Hosting Files > SSP Applications > NetSuite Inc. -Checkout 2.05.0 > Custom Checkout > js > src > core
- Click on ‘Add files’ and select the ‘Util.js’ that you modified.
- Replace the ‘img/altapay.jpg’ with an image that represents the payment method. The image can be uploaded from here: Documents > Files > File Cabinet and navigate to Web Site Hosting Files > Live Hosting Files > SSP Applications > NetSuite Inc. - Checkout 2.05.0 > Custom Checkout -> img
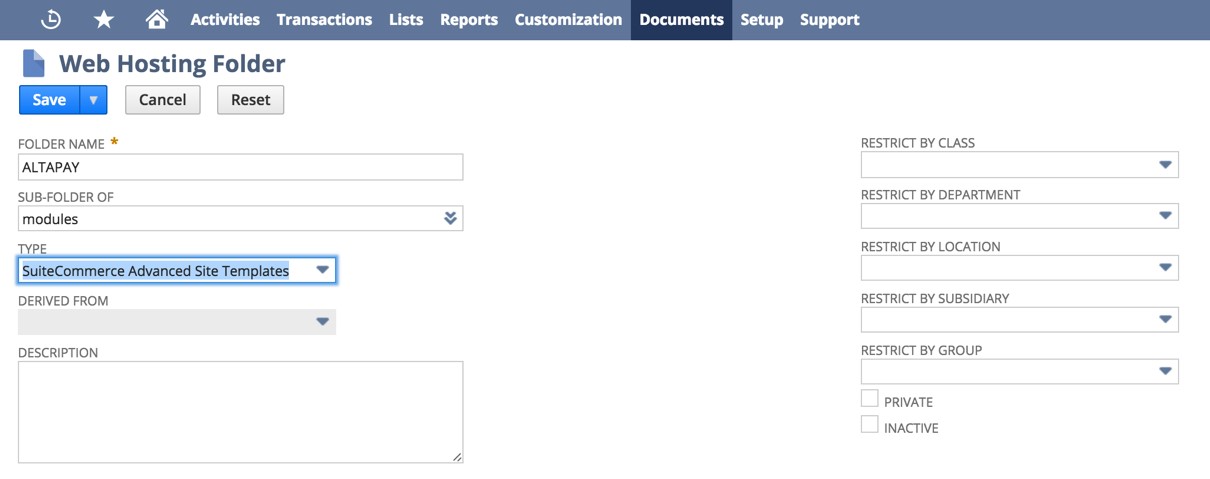
- Go to: Documents > Files > File Cabinet > Web Site Hosting Files > Live Hosting Files > SSP Applications > NetSuite Inc. - Checkout 2.05.0 > Custom Checkout > js > src > app > modules >
- Click on New Folder > name it Altapay
- Select SuiteCommerce Site Templates before saving the new folder in the TYPE dropdown

- Go to: Documents > Files > File Cabinet > Web Site Hosting Files > Live Hosting Files > SSP Applications > NetSuite Inc. - Checkout 2.05.0 > Custom Checkout > js > src > app > modules > Altapay
- Click ‘Add files’ and select the ‘configuration.js’, that you modified
- Go to: Documents > Files > File Cabinet > Web Site Hosting Files > Live Hosting Files > SSP Applications > NetSuite Inc. - Checkout 2.05.0 > Custom Checkout > js >
- Click ‘DELETE FILES’ and remove the following files: ‘Application-xxxxx.js’ and ‘current.js’
- Click ‘Edit’ for the ‘combiner.config’ Click on the ‘edit’ link
A popup opens > add the following string ’src/app/modules/Altapay/*.js’, as seen below
Input-files: utils/BootUtilities.js utils/json2.js libs/require.js libs/underscore.js
libs/jquery.js libs/backbone.js libs/backbone.validation.js libs/bootstrap.js
src/core/Main.js src/core/Utils.js src/core/ApplicationSkeleton.js
src/app/modules/BackToTop/*.js src/core/extras/*.js src/app/Application.js
src/app/Configuration.js src/app/ItemsKeyMapping.js src/app/modules/Account/*.js
src/app/modules/Address/*.js src/app/modules/AjaxRequestsKiller/*.js
src/app/modules/Cart/*.js src/app/modules/Content/*.js
src/app/modules/CMSadapter/*.js src/app/modules/CreditCard/*.js
src/app/modules/ErrorManagement/*.js src/app/modules/GoogleAnalytics/*.js
src/app/modules/GoogleUniversalAnalytics/*.js
src/app/modules/GoogleAdWords/*.js src/app/modules/Facets/*.js
src/app/modules/ItemDetails/*.js
src/app/modules/ItemOptionsHelper/*.js src/app/modules/LoginRegister/*.js
src/app/modules/Merchandising/*.js
src/app/modules/MultiCurrencySupport/*.js
src/app/modules/MultiHostSupport/*.js src/app/modules/NavigationHelper/*.js
src/app/modules/Order/*.js src/app/modules/OrderWizard/*.js src/app/modules/Profile/*.js
src/app/modules/SiteSearch/*.js src/app/modules/Session/*.js
src/app/modules/UrlHelper/*.js src/app/modules/User/*.js
src/app/modules/Altapay/*.js src/app/modules/Wizard/*.js
src/app/modules/CheckoutSkipLogin/*.js src/app/modules/BrontoIntegration/*.js Starter.js
Combined-file: Application.js
Keep-files: 1
Method: Minify
Referring-files: ../*.ssp
Version: 2
- Save the file and make sure that the ’Application-xxxx.js’ and ’current.js’ files have been regenerated.

Alternative payment methods
If you support alternative payment methods (e.g. wallet, ePayment etc.), you can add the alternative web shop’s payment methods by follow the instructions below
- Go to setup > Accounting > Payment Processing Profiles > ‘Add AltaPay Plugin Profile’.
- Complete the details, using the screenshot and notes below for guidance.

Web Site
Select which web sites the bundle should cover
Name
Add ‘Name’. This is for internal use and will not be shown to customers. We recommend to name it ‘Payment Method - Currency’ (e.g. Invoice – EUR)
Subsidiary
Select from the drop down list
Settlement Currency
Select from the drop down list
CHARGE CURRENCIES
This must correspond with the currency of the terminal. You can only select one currency
Settlement Bank account
This is related to accounting and will not affect the settlement agreement with the acquirer
Authentication Credentials
> Add username and password. You will only be able to see asterisks, since they are password fields
AltaPay configuration
Add terminal.
Alternative payments
Check this checkbox
Website
Type the index of the website, that the payment processing profile is related to. Default is 1
AVS Accept
Enter the AVS cases that should be accepted.
In order to control AVS cases, the checkbox “Enable AVS” must be clicked in the payment processing profile. Note that AVS must also be supported by the acquirer and is only supported by issuers in the US, Canada and UK.
Use uppercases and separate them by comma (e.g. A,B,D).
If an AVS result does not appear in Accept or Hold, the AVS result will be rejected and the order cancelled. If an AVS result is in both textboxes, the hold case has first priority.
AVS Hold
Enter the AVS cases that should be put on hold.
Use uppercases and separate them by comma (e.g. A,B,D).
If an AVS result does not appear in Accept or Hold, the AVS result will be rejected and the order cancelled. If an AVS result is in both textboxes, the hold case has first priority.
- Press .
- Go to Setup > Accounting > Accounting lists > New
- Select ‘Payment Method’.
Complete the details, using the screenshot and the notes below for guidance.
PAYMENT METHOD Name the payment method. This will be shown in the web shop EXTERNAL CHECKOUT Check this checkbox SUPPORTING MERCHANT ACCOUNTS Select the Payment processing profile you defined earlier that you want to match the payment method with COUNTRIES Check ‘DISPLAY IN WEB SITE’ - Select the tab ‘Payment Visuals’
- Add flag, and URL with a picture that represents the payment method.
- Press .
Enable alternative payment in NetSuite
- Go to Setup > Side Builder/SCA > Setup web site.
- Select the web site to enable alternative payments
- Go to the shopping tab
- In the Payments Page, enable 'ALLOW NON-CREDIT CARD PAYMENT METHODS DURING CHECKOUT'.
- Press .
Add payment form
- Download the zip file from the GitHub repository
- Find the ‘ns_form.html’ in the ‘Alternative payments’ subfolder
- Go to: Documents > Files > File Cabinet > Web Hosting Files > Live Hosting > site
- Click on ‘Add file’ and select the ‘ns_form.html’